Silverlight for Flex developers: Part 1 – Basic Layout in Blend

31 03 2009

So, to put my money where my mouth is, I’ve finally starting to approach Silverlight from a Flex perspective.

Personally, I develop in both .NET and Flex/AIR. Last year, I saw this example  by Robby Ingebretsen and decided that there was more to Silverlight than meets the eye. 

Part One: Basic Layout in Blend 3

I’ve decided to start this series with layout and components. Now, I’m making a few guesses and assumptions as I go, so I encourage anyone who notices discrepancies to comment away.

First off, Download Expression Blend 3 Preview. It’s free until September 09, so go get it. (Blend is actually a WPF application).

Second, create a new Silverlight application.

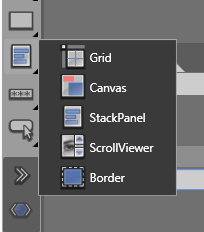
Now, having a look inside Blend take a gander at the Layout containers:

Blend Layout Containers

Layout Containers

  • Grid – interesting component, seemingly very well used, not really comparable to Flex Grid as it is composed of invisible rows and columns and allows customisable anchoring and scaling within each cell.
  • Canvas – this is like the Canvas in Flex, an absolutely positioned layout container.
  • StackPanel – think Box. It’s the same idea. Layout by stacking children either vertically or horizontally. 
  • ScrollViewer – Scrolling is not something inherit to all containers like it is in Flex 3. It is something you add to a layout component if you choose. Flex 4 (Gumbo) seems to be going this way as well.
  • Border – As with scrolling, bordering isn’t native to containers. It needs to be added in also.

Collapsed Visibility

Something to note here too is collapsed visibility. A nice feature of XAML that Flex has yet to implement . Say you have a Flex VBox with 3 buttons and you wanna remove a button, you’d use either a ViewStack or a State, right? (or maybe actionscript if you were keen)  – in Silverlight, you can set visibility to Collapse to achieve the same thing.

Anchoring & Margins

Essentially, components can either use  a margin to determine how wide and high they are or use alignment + width and height. The latter must be placed in a Grid/ScrollViewer/Border and then using both the width/height and the HorizontalAlignment and VericalAlignment tools to lay them out.

If you opt for the Canvas container instead, you then use the typical top, left and z-index to layout the items.  

Attached Backgrounds

Another nice feature is how the background can be easily customised. For example, try out the Gradient tool and apply it to any container (or component for that matter – like shapes, text or buttons). 

Gradient Tool

See the XAML? (switch to Split view). See how applying the Gradient tool to a


  • Grid goes under <Grid.Background>
  • Button comes under <Button.Background>
  • TextBlock comes under <TextBlock.Foreground>

This is similar to accessing the graphics property of any UIComponent in Flex. However, the obvious advantage here is how easy Expression tooling makes applying gradients to any object.


AIR multiple file uploads: drag n drop to client zip to server upload and unzip

25 03 2009

The aim of this post is to get an AIR application to take a collection of files dragged n dropped onto it, zip them up on the client, and send them off to the server (ASP.NET). 

There are a few things to note here:

  • Flash officially supports files of up to 100MB, trying to ZIP anything larger and you WILL run into server memory issues; Flash will crash. You can use File.upload() for files > 100MB, but trying to ZIP them will cause the crash.
  • ZIPping on the client takes time, 50MB could take from 15s to a minute. The code supplied performs it sync (not async). 
  • client software FZip, server zip : ISharpZipLib 
  • uploading manually (using URLLoader instead of File.upload means in you cannot track the Upload’s progress – as of AIR 1.5).


Step 1. The Drag & Drop in AIR

This is quite trivial. Allowing the user to drag and drop as many files/folders onto your application.

Client (AIR) code:

<?xml version="1.0" encoding="utf-8"?>
<mx:WindowedApplication 

	nativeDragEnter="onDragEnter(event)"
	nativeDragDrop="onDragDrop(event)"

	layout="absolute" 

	xmlns:mx="http://www.adobe.com/2006/mxml" >

	<mx:Script>
		<![CDATA[

			import mx.managers.DragManager;
			import mx.events.DragEvent;

			private function onDragEnter(evt:NativeDragEvent):void
			{
				//ensure clipboard contains files
				if (evt.clipboard.hasFormat(ClipboardFormats.FILE_LIST_FORMAT))
				{
					NativeDragManager.acceptDragDrop(this);
				}
			}

			private var _filesToUpload:Array;

			private function onDragDrop(evt:NativeDragEvent):void
			{
				_filesToUpload = evt.clipboard.getData(ClipboardFormats.FILE_LIST_FORMAT) as Array;
			}

		]]>
	</mx:Script>

</mx:WindowedApplication>


Step 2. Zipping on the client

The nicest solution I could find for compressing files in AIR to ZIP is FZip.

I tried another library, but ISharpLib didn’t like it, it was giving me EOF file header issues in the ZIP decompression.

So the solution is to take the ZIP byteArray and to send it via the lower level URLLoader class.

NOTE: this uses the FileStream.open is sync mode. You could use FileStream.openAsAsync though it would obviously require listening and handling the corresponding events.

Client (AIR) code [URLLoader.load() solution]:

var request:URLRequest = new URLRequest("http://example.com/Handlers/UploadHandler.ashx");

request.method = URLRequestMethod.POST;
request.contentType = "application/octet-stream";

var loader:URLLoader = new URLLoader();

loader.dataFormat =  URLLoaderDataFormat.BINARY;

loader.addEventListener(Event.OPEN, onFileUploadStart,false,0,true);

//no point listening for progress, because it doesn't work for URLLoader uploads, only downloads
//loader.addEventListener(ProgressEvent.PROGRESS, onFileUploadProgress,false,0,true);

loader.addEventListener(Event.COMPLETE,onFileUploadComplete,false,0,true);

var fzip:FZip = new FZip();

for each (var file:File in model.filesToUpload)
{
	var fs:FileStream = new FileStream();
	fs.open(file, FileMode.READ);
	var data:ByteArray = new ByteArray();
	fs.readBytes(data);
	fs.close();

	fzip.addFile(file.name, data);
}

var bytes:ByteArray = new ByteArray();
fzip.serialize(bytes);

request.data = bytes;

loader.load(request);


What about sending extra parameters?

Client (AIR) code:
var request:URLRequest = new URLRequest("http://example.com/Handlers/UploadHandler.ashx?someVariable=" + someVariable);

What about the upload progress bar? 

If you need the progress bar, then you’re best option is writing this zip file to the client and uploading that. 

This also means that if you have optional parameters, you don’t have to append them to the URL but can send them in the data.

This changes the client code to use File.upload().

Client (AIR) code – [File.upload() solution]:

var params:URLVariables = new URLVariables();

params.someVariable = someVariable;
//add other variables here

var request:URLRequest = new URLRequest(model.UPLOAD_URL);

request.method = URLRequestMethod.POST;
request.data = params;

var fzip:FZip = new FZip();

for each (var file:File in model.filesToUpload)
{
	var fs:FileStream = new FileStream();
	fs.open(file, FileMode.READ);
	var data:ByteArray = new ByteArray();
	fs.readBytes(data);
	fs.close();

	fzip.addFile(file.name, data);
}

//get the zip as a byte array
var bytes:ByteArray = new ByteArray();
fzip.serialize(bytes);

//write the zip to a local file
var fsW:FileStream = new FileStream();
//change "tmp.zip" to a better name :)
var wFile:File = File.applicationStorageDirectory.resolvePath("tmp.zip");

fsW.open(wFile, FileMode.WRITE);
fsW.writeBytes(bytes);
fsW.close();

//listen to upload events
wFile.addEventListener(Event.OPEN, onFileUploadStart,false,0,true);
wFile.addEventListener(ProgressEvent.PROGRESS, onFileUploadProgress,false,0,true);
wFile.addEventListener(Event.COMPLETE,onFileUploadComplete,false,0,true);

//start the upload
wFile.upload(request);


Step 3. Unzipping on the server

Now, I use SharpZipLib in .NET because it’s Open Source, and because it’s also bundled with WebORB .NET, the remoting gateway that I often use.

If you use the URLLoader.load() option above (from Step 2) – then you must use Request.InputStream to access the parameters

Server (ASP.NET C# Handler – ashx) code: (SharpZipLib extraction)

using ICSharpCodeInternal.SharpZipLib.Zip; 
   public class UploadHandler : IHttpHandler {

        public void ProcessRequest (HttpContext context)
        {
            String someVariable = context.Request["someVariable"];

            ZipInputStream zipStream = new ZipInputStream(context.Request.InputStream);
            ZipEntry zipEntry;

            while (true)
            {
                zipEntry = zipStream.GetNextEntry();

                if (zipEntry == null)
                {
                    break;
                }

                //choose location to extract files to
                string serverFolder = context.Server.MapPath("~/Uploads/");

                FileStream streamWriter = File.Create(( serverFolder + zipEntry.Name));

                int size = 2048;

                byte[] data = new byte[2048];

                while (true)
                {
                    size = zipStream.Read(data, 0, data.Length);

                    if (size > 0)
                    {
                        streamWriter.Write(data, 0, size);
                    }
                    else
                    {
                        break;
                    }
                }

                streamWriter.Close();

            }

            zipStream.Close();
        }
    }


If you are using File.upload() on the client 

You’re Handler in ASP.NET now will be looking in the context.Request.Files array for the attached ZIP.

Modified Server (ASP.NET C# Handler – ashx) code:

ZipInputStream zipStream = new ZipInputStream(context.Request.Files[0].InputStream);


If you need folder structures

To do ZIP folders, you simply add the folder name before the file when you ZIP:

Modified Client (AIR) code:

fzip.addFile(folderName + "/" + file.name, data);


And then in the server code, you need to create directories if required:

Modified Server (ASP.NET C# Handler – ashx) code:

//existing code
...
string serverFolder = context.Server.MapPath("~/Uploads/");
string dir = Path.GetDirectoryName(serverFolder + zipEntry.Name);

if (!Directory.Exists(dir))
{
    Directory.CreateDirectory(dir);
}                

//existing code
FileStream streamWriter = File.Create(( serverFolder + ze.Name));

...


Rich clients (Flex/AIR/Silverlight) & LINQ : data across the pipe

19 03 2009

I’ve blogged before about Flex & LINQ, but I’m always learning new things, and I wanted to share some of my most recent findings.

Note: this article focuses on Flex & LINQ, but it could as easily be applied to Silverlight & LINQ as well. Silverlight 3 is set to merge client & server with .NET 4.0, but I believe the issue of how much and when to send data between client & server will continue to be relevant.

First off, why LINQ?

  1. With LINQ on your server layer, you can avoid having to write your server value objects – LINQ to SQL will do that for you from your DB schema – allows you to quickly updates these objects if your schema ever changes (and let’s face it, it will). NOTE: unfortunately, there is no free & easy way to sync your LINQ to SQL context to your schema in VS2008).
  2. You can put all your SQL as strongly-typed code in your DAL rather than having to call the DB to do it via stored procs, which decouples your DB from your application, allowing you to switch databases if you ever wanted to, and keeps all your server code in one place. 
  3. Cleaner and shorter code – easier for you, easier for other developers to understand (as long as they understand LINQ 🙂 )

So, if you’ve decided to take the LINQ option and your a Flex or AIR developer, then there is good news. 

Products such as WebORB.NET and FluorineFx both support .NET 3.5 and will allow your Flex application to send Remote Objects back and forth between the two. Yes you could use Web Services to do communicate with the server, but I’m assuming you’ve read up on the performance benefits of remoting and AMF vs Web Services, and you’re opting for speed.

The question is however, how do you do it?

The LINQ to SQL tool (I’m not going to mention the ADO.NET Entities tool, which is more feature rich, but a touch more complicated) creates you a data context as you know. This remembers the actions you perform on your objects and will propagate the changes back to the DB when you “SubmitChanges()”. However, when you’re working on the Flex/.NET model, you’re now using LINQ on an middle-tier (or even an n-tier) application, and that changes things.

What changes is that the “context” will be a new instance between each request (unless you use session access to the RemoteObjects, which I won’t get into here). LINQ won’t know that you changed something outside this context, and so to Update an object in the database you will need to “Attach()” it back to the current context to save it, along with it’s original but from a new  context. (See examples below).

Now, there are plenty of articles out there on LINQ in the middle tier and LINQ with n-tier, so I won’t reinvent the wheel. What I will do is talk about strategies on how to leverage LINQ in your Flex app, and how to synchronise data.

Let’s take a think about possible methodologies for sending/receiving related object data from server to client:

  • Safety method: take a little save a little
  • Hungry method: take a little save lots
  • Greedy method: take everything save lots
  • Thrifty method: take everything save a little

I’ll use the following example to illustrate the different methods:
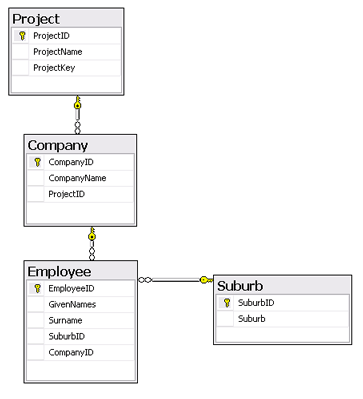
Example Schema


Safety Method

The safety method is a simple-to-follow, clear 1:1 system  – load an object when you need it, and load the associated objects as you need them. When you save data back, call the server with either one or a collection of single unrelated objects. You rely on your foreign keys to do all the loading.

All associations within the LINQ to SQL designer (DBML) need to have INTERNAL access, to prevent them being sent to the client, and so that you can still use them within the server code. 

For example: Your client wants the list of projects? It loads them simply via LINQ. Client wants the project’s list of Companies? Load them via the ProjectID. Need to save a Company, send the server the Company object with an associated ProjectID. 


Hungry Method

The hungry method involves retrieving just the data objects you require at the time and building up the object model on the client side, eventually sending back an object with related objects. This means you don’t have an excessive number of save calls back to the server, and you don’t rely on the foreign key, you rely on the attached object.

For example:   You may want to load all Projects within the system via LINQ, but don’t want the associated Companies, Employees or Suburbs. You then want to create a new Project and create Companies, Employees. You then call one Save() method to save the new Project, and let LINQ create the entire collection of Company and Employee records.

Now, by default, LINQ will try to send you all the related Companies, Employees and related Suburbs when you ask for the list of Projects.  You have two main options to avoid this:

  1. Change the ACCESS of the association(s) between parent and child within the DBML (LINQ to SQL) editor to INTERNAL. This means only inside the DLL could you access this property.
  2. In your server DLL, NULL any related properties before returning the data to the client. (Literally: project.Companies = null).    

Do you see the problem? Option 1 is the obvious choice but then it means you couldn’t actually send the data back to .NET because if you tried to send a Project back with Companies attached, .NET would say that Project doesn’t have the Companies property as the association as it is internal (and the exception happens during unmarshalling on the server, handled by either the WebORB or FluorineFx DLL).

The Hungry method starts to become a real issue with visibility, and unfortunately, the easiest is to follow option 2 above, which is not a good solution in my opinion.

NOTE: When saving back to the server, do NOT send back both an associated object and an associated foreign key. This will cause .NET to except. EG: If you were to save a Company with an attached Project, you couldn’t also send back Company’s ProjectID (the FK), .NET wouldn’t know which association to use. 

So, in your client code, either remove the Foreign Keys completely from the value object, or use a property getter only to get the foreign key from the association object.


Greedy Method

The greedy method is expensive. You are always sending and receiving all (or a lot) of the data in a single call. The advantage is, less trips between the client and server, and minimal client & server code (one Save method to do everything!).

As you can imagine, debugging the Save method can be a headache – as debugging LINQ usually is 🙂 

Now, to Update an object under the greedy method is tricky yet fun. You need to Attach() this new object to the context, along with it’s original from yet another context. 

For example: You want to load all Employees and their Suburb plus their Company and it’s Project. If you wanted to save it back, you’d need to attach it back in. 

Employee SaveEmployee(Employee e) 
{
  DataClassesDataContext context = new DataClassesDataContext();

  //if is Update
  if (e.EmployeeID > 0) 
  {
     //need to attach Employee with a NEW INSTANCE of the DataContext
     Employee oldEmployee = new DataClassesDataContext().Employees.Single( p => p.EmployeeID == e.EmployeeID);

     //now attach it
     context.Attach(e, oldEmployee);
  }
  else
  {
     context.Employees.InsertOnSubmit(e);
  }
  context.SubmitChanges();
  return e;
}


This can get even tricker when you’re attaching objects with children which already exist. It can require going through the children and testing their Primary Keys using the method above.


Thrify Method

The thrifty method involves receiving all the required data, and just sending back the minimal amount of objects back to the server for a successful save. 

To prevent data being sent back to the server once it is already in the Flex client, requires the use of the Flex metatag: [Transient]. To use Thrifty, we need to rely on Foreign Key associations as LINQ will use the FK on the insert  (just like saving in the Safety method). The advantage is that you have complete control over anything being saved into your database, which can be a real advantage in a intricate & lengthy project. 

Generally using this method, you would need to recall all of your data again, as some associations have been modified. You can try an sychronise these on the client, but it can get VERY tricky. At the very least, you’ll need to return your saved object to get it’s ID if it was just inserted.

For example: You want to load all Projects from the system, but when you save a Project, you don’t t send back it’s Companies, this property is Transient on the client and doesn’t get send back to the server. If you wanted to save a Company, you’d send back a Company object without the associated Project object, but WITH the ProjectID Foreign Key.


I personally use a combination of the Thrifty and the Greedy method, deciding when I want to send all the data back, and when I just want to send back an individual object. It still means however, that I need to reload ALL of my data again after a successful save of some object. 

The most important things to remember is attaching to a new context, and not sending both a foreign key and a related foreign object back to the server simultaneously – this upsets LINQ. 

More examples and further investigation to come…


Silverlight Client to Server Remoting

11 02 2009

Being the Flex/AIR to .NET developer that I am, I find Silverlight curious to say the least.

Initially I had assumed that Silverlight 2, as it was deployed inside an ASP.NET side, would automatically handle remote objects from the client to the server. This would alliviate the developer from having to write two classes for her value objects (one on the client and one on the server). Moreover, it would minimise the amount of setup time to get going.

Turns out, it doesn’t. Not in .NET 3.5. You’ve got the options of using Web Services or solutions like WebORB .NET for Silverlight (using AMF).

Posing the question on Twitter today, I was sent the following link from Tim Heuer from the Silverlight team:

http://channel9.msdn.com/pdc2008/PC11/

So, it seems the future of Silverlight, within .NET 4.0 and Visual Studio 2010 is a seamless integration from server to client via the one code base.

Something Mr. Cool (the speaker from said video) didn’t mention in whether or not the server would require the “Dublin” addition to IIS. This seems to be the way .NET 4.0 is achieving the communication from Client to Server. I think I need to test drive VS2010 to be sure.

The code to get the communication between the client and server is fairly bloaty – and seems a bit hackish at this stage. I get the impression MS are trying to quickly increase the functionality of Silverlight before too many people invest in the Flex Framework. MS are down in the fight as Silverlight currently can’t escape the browser unlike AIR  (WPF can too but it’s Windows dependant). I guess they want to entice the developers via integration rather than the software architects by reach.


Threading in ASP.NET : quick start

28 03 2008

Threading. God loves it, and so should you.

It’s pretty easy to get started threading in .NET. So why wait?

But why would you want to multithread? There are plenty of different occasions, but essentially when you have some processes that should run asynchronously. This could include an automatic conversion process for some uploaded file – there’s nothing better than throwing it to a thread (or even a Windows Service) to process. That way, the user doesn’t have to wait for conversion to complete before they get back to your site.

Getting going is pretty easy, the complications come when you start looking at threads that use the same data.

Essentially, you start the Thread either as an empty method call, or by passing it some object. You should at least know what a delegates is first (essentially it is a function that can be passed around like a variable).

Now, I prefer the Parameterised (i’m Aussie, so I don’t like using Z where it’s an S 😛 ) option below just because I often want to pass at least something.

C#

using System.Threading;

ParameterizedThreadStart starter = delegate(object prop){SomeObject.SomeMethod(prop)); };
new
Thread(starter).Start(someObject);

One thing you need to remember here though is, if you are calling this in ASP.NET, then it’s the aspnet_wp.exe process that starts the thread, and if this is killed or restarted somehow, then it will kill your thread also.

It could be killed or restarted for the following reasons:

  • change in global.asax file,
  • change in machine.config,
  • change in web.config
  • change of content of /bin folder
  • IIS service is interrupted (incl restart)
  • Server is restarted

One thing you will learn to love: the Thread.Sleep() method and the System.Threading.Timer class…

Enjoy!

Useful Reference: This article gives a great intro into threads.