Speaking at 360Flex this April
23 03 2012Comments : Leave a Comment »
Tags: 360flex, conferences, development, maven, speaking
Categories : Uncategorized
Flex: Wrapping an ArrayCollection of Arrays
7 04 2009April 15, 2009 Update: Unfortunately, DynamicCollection performs badly when the underlying arrays exceed a thousand elements. Stay tuned for an update.
What if you have a few Arrays or ArrayCollections of the same object data, and you want them to display as a single dataProvider?
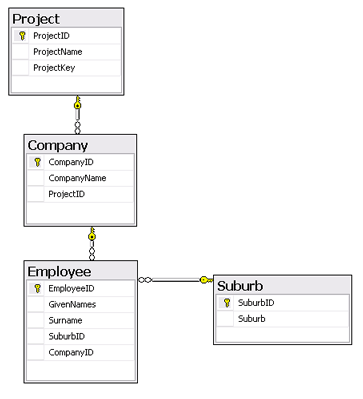
Using the below schema as an example, say you loaded a list of Projects from the DB and you want to display all the Companies in a single DataGrid. Or a list of all Employees. How would you do it?
 Sure you could append them all to one big Array or ArrayCollection. Although you leave open the door for inconsistencies when you add a Company to some Project object.
This is where the DynamicCollection comes in.
Essentially it is an ArrayCollection containing Arrays of the same object type.
However, when iterated over, it behaves as a single ArrayCollection.
This means, when you alter the source arrays, the DynamicCollection will change also.
I have written the solution twice, once using Arrays and once using ArrayCollections as the elements. If you use the former, you have to call “refresh()” on the collection after updating any of the child arrays to enable databinding.
I’ve found it better to stick to Arrays noting that from Jon Rose’s blog and examples, you lose performance with a high number of ArrayCollections.
Below is the DynamicCollection class and an example implementation.
NOTE: I haven’t had the time to test it out with other ListBase implementations – feel free to comment on any issues you encounter.
Example
(Right-click flash movie to view source).
Comments : Leave a Comment »
Tags: development, flex
Categories : Uncategorized
Silverlight for Flex developers: Part 1 – Basic Layout in Blend
31 03 2009So, to put my money where my mouth is, I’ve finally starting to approach Silverlight from a Flex perspective.
Personally, I develop in both .NET and Flex/AIR. Last year, I saw this example by Robby Ingebretsen and decided that there was more to Silverlight than meets the eye.
Part One: Basic Layout in Blend 3
I’ve decided to start this series with layout and components. Now, I’m making a few guesses and assumptions as I go, so I encourage anyone who notices discrepancies to comment away.
First off, Download Expression Blend 3 Preview. It’s free until September 09, so go get it. (Blend is actually a WPF application).
Second, create a new Silverlight application.
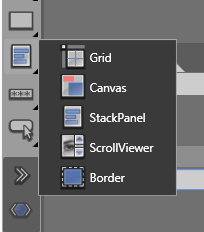
Now, having a look inside Blend take a gander at the Layout containers:

Layout Containers
- Grid – interesting component, seemingly very well used, not really comparable to Flex Grid as it is composed of invisible rows and columns and allows customisable anchoring and scaling within each cell.
- Canvas – this is like the Canvas in Flex, an absolutely positioned layout container.
- StackPanel – think Box. It’s the same idea. Layout by stacking children either vertically or horizontally.
- ScrollViewer – Scrolling is not something inherit to all containers like it is in Flex 3. It is something you add to a layout component if you choose. Flex 4 (Gumbo) seems to be going this way as well.
- Border – As with scrolling, bordering isn’t native to containers. It needs to be added in also.
Collapsed Visibility
Something to note here too is collapsed visibility. A nice feature of XAML that Flex has yet to implement . Say you have a Flex VBox with 3 buttons and you wanna remove a button, you’d use either a ViewStack or a State, right? (or maybe actionscript if you were keen) – in Silverlight, you can set visibility to Collapse to achieve the same thing.
Anchoring & Margins
Essentially, components can either use a margin to determine how wide and high they are or use alignment + width and height. The latter must be placed in a Grid/ScrollViewer/Border and then using both the width/height and the HorizontalAlignment and VericalAlignment tools to lay them out.
If you opt for the Canvas container instead, you then use the typical top, left and z-index to layout the items.
Attached Backgrounds
Another nice feature is how the background can be easily customised. For example, try out the Gradient tool and apply it to any container (or component for that matter – like shapes, text or buttons).

See the XAML? (switch to Split view). See how applying the Gradient tool to a
- Grid goes under <Grid.Background>
- Button comes under <Button.Background>
- TextBlock comes under <TextBlock.Foreground>
This is similar to accessing the graphics property of any UIComponent in Flex. However, the obvious advantage here is how easy Expression tooling makes applying gradients to any object.
Comments : 1 Comment »
Tags: .net, blend, development, flex, silverlight
Categories : Uncategorized
AIR multiple file uploads: drag n drop to client zip to server upload and unzip
25 03 2009The aim of this post is to get an AIR application to take a collection of files dragged n dropped onto it, zip them up on the client, and send them off to the server (ASP.NET).
There are a few things to note here:
- Flash officially supports files of up to 100MB, trying to ZIP anything larger and you WILL run into server memory issues; Flash will crash. You can use File.upload() for files > 100MB, but trying to ZIP them will cause the crash.
- ZIPping on the client takes time, 50MB could take from 15s to a minute. The code supplied performs it sync (not async).
- client software FZip, server zip : ISharpZipLib
- uploading manually (using URLLoader instead of File.upload means in you cannot track the Upload’s progress – as of AIR 1.5).
Step 1. The Drag & Drop in AIR
This is quite trivial. Allowing the user to drag and drop as many files/folders onto your application.
Client (AIR) code:
<?xml version="1.0" encoding="utf-8"?>
<mx:WindowedApplication

	nativeDragEnter="onDragEnter(event)"
	nativeDragDrop="onDragDrop(event)"

	layout="absolute"

	xmlns:mx="http://www.adobe.com/2006/mxml" >

	<mx:Script>
		<![CDATA[

			import mx.managers.DragManager;
			import mx.events.DragEvent;

			private function onDragEnter(evt:NativeDragEvent):void
			{
				//ensure clipboard contains files
				if (evt.clipboard.hasFormat(ClipboardFormats.FILE_LIST_FORMAT))
				{
					NativeDragManager.acceptDragDrop(this);
				}
			}

			private var _filesToUpload:Array;

			private function onDragDrop(evt:NativeDragEvent):void
			{
				_filesToUpload = evt.clipboard.getData(ClipboardFormats.FILE_LIST_FORMAT) as Array;
			}

		]]>
	</mx:Script>

</mx:WindowedApplication>
Step 2. Zipping on the client
The nicest solution I could find for compressing files in AIR to ZIP is FZip.
I tried another library, but ISharpLib didn’t like it, it was giving me EOF file header issues in the ZIP decompression.
So the solution is to take the ZIP byteArray and to send it via the lower level URLLoader class.
NOTE: this uses the FileStream.open is sync mode. You could use FileStream.openAsAsync though it would obviously require listening and handling the corresponding events.
Client (AIR) code [URLLoader.load() solution]:
var request:URLRequest = new URLRequest("http://example.com/Handlers/UploadHandler.ashx");

request.method = URLRequestMethod.POST;
request.contentType = "application/octet-stream";

var loader:URLLoader = new URLLoader();

loader.dataFormat =  URLLoaderDataFormat.BINARY;

loader.addEventListener(Event.OPEN, onFileUploadStart,false,0,true);

//no point listening for progress, because it doesn't work for URLLoader uploads, only downloads
//loader.addEventListener(ProgressEvent.PROGRESS, onFileUploadProgress,false,0,true);

loader.addEventListener(Event.COMPLETE,onFileUploadComplete,false,0,true);

var fzip:FZip = new FZip();

for each (var file:File in model.filesToUpload)
{
	var fs:FileStream = new FileStream();
	fs.open(file, FileMode.READ);
	var data:ByteArray = new ByteArray();
	fs.readBytes(data);
	fs.close();

	fzip.addFile(file.name, data);
}

var bytes:ByteArray = new ByteArray();
fzip.serialize(bytes);

request.data = bytes;

loader.load(request);
What about sending extra parameters?
var request:URLRequest = new URLRequest("http://example.com/Handlers/UploadHandler.ashx?someVariable=" + someVariable);
What about the upload progress bar?
If you need the progress bar, then you’re best option is writing this zip file to the client and uploading that.
This also means that if you have optional parameters, you don’t have to append them to the URL but can send them in the data.
This changes the client code to use File.upload().
Client (AIR) code – [File.upload() solution]:
var params:URLVariables = new URLVariables();

params.someVariable = someVariable;
//add other variables here

var request:URLRequest = new URLRequest(model.UPLOAD_URL);

request.method = URLRequestMethod.POST;
request.data = params;

var fzip:FZip = new FZip();

for each (var file:File in model.filesToUpload)
{
	var fs:FileStream = new FileStream();
	fs.open(file, FileMode.READ);
	var data:ByteArray = new ByteArray();
	fs.readBytes(data);
	fs.close();

	fzip.addFile(file.name, data);
}

//get the zip as a byte array
var bytes:ByteArray = new ByteArray();
fzip.serialize(bytes);

//write the zip to a local file
var fsW:FileStream = new FileStream();
//change "tmp.zip" to a better name :)
var wFile:File = File.applicationStorageDirectory.resolvePath("tmp.zip");

fsW.open(wFile, FileMode.WRITE);
fsW.writeBytes(bytes);
fsW.close();

//listen to upload events
wFile.addEventListener(Event.OPEN, onFileUploadStart,false,0,true);
wFile.addEventListener(ProgressEvent.PROGRESS, onFileUploadProgress,false,0,true);
wFile.addEventListener(Event.COMPLETE,onFileUploadComplete,false,0,true);

//start the upload
wFile.upload(request);
Step 3. Unzipping on the server
Now, I use SharpZipLib in .NET because it’s Open Source, and because it’s also bundled with WebORB .NET, the remoting gateway that I often use.
If you use the URLLoader.load() option above (from Step 2) – then you must use Request.InputStream to access the parameters
Server (ASP.NET C# Handler – ashx) code: (SharpZipLib extraction)
using ICSharpCodeInternal.SharpZipLib.Zip;
   public class UploadHandler : IHttpHandler {

        public void ProcessRequest (HttpContext context)
        {
            String someVariable = context.Request["someVariable"];

            ZipInputStream zipStream = new ZipInputStream(context.Request.InputStream);
            ZipEntry zipEntry;

            while (true)
            {
                zipEntry = zipStream.GetNextEntry();

                if (zipEntry == null)
                {
                    break;
                }

                //choose location to extract files to
                string serverFolder = context.Server.MapPath("~/Uploads/");

                FileStream streamWriter = File.Create(( serverFolder + zipEntry.Name));

                int size = 2048;

                byte[] data = new byte[2048];

                while (true)
                {
                    size = zipStream.Read(data, 0, data.Length);

                    if (size > 0)
                    {
                        streamWriter.Write(data, 0, size);
                    }
                    else
                    {
                        break;
                    }
                }

                streamWriter.Close();

            }

            zipStream.Close();
        }
    }
If you are using File.upload() on the client
You’re Handler in ASP.NET now will be looking in the context.Request.Files array for the attached ZIP.
Modified Server (ASP.NET C# Handler – ashx) code:
ZipInputStream zipStream = new ZipInputStream(context.Request.Files[0].InputStream);
If you need folder structures
To do ZIP folders, you simply add the folder name before the file when you ZIP:
Modified Client (AIR) code:
fzip.addFile(folderName + "/" + file.name, data);
And then in the server code, you need to create directories if required:
Modified Server (ASP.NET C# Handler – ashx) code:
//existing code
...
string serverFolder = context.Server.MapPath("~/Uploads/");
string dir = Path.GetDirectoryName(serverFolder + zipEntry.Name);

if (!Directory.Exists(dir))
{
    Directory.CreateDirectory(dir);
}

//existing code
FileStream streamWriter = File.Create(( serverFolder + ze.Name));

...
Comments : 11 Comments »
Tags: .net, adobe, air, asp.net, c#, development, flex
Categories : Uncategorized
Flex: understanding databinding: oneway and twoway
17 02 2009Something that isn’t that well talked about in the Flex world is two way databinding, and it’s implications.
I was working with an MVC project recently and I came up to an interesting problem with an ArrayCollection somewhere in the View that was bound oneway from the Model. When I changed a property of the object in the View, it changed in the Model. Huh? I didn’t use two-way databinding so why would this happen?
I realised this was due to the fact that while one-way databinding doesn’t change the source when the destination object changes, it DOES ensure that both objects have the same reference. The implication here is that if you change a property of the destination object, it will change in the source as well. They are the same object reference after all.
Let’s prove this with examples. Simple databinding in Flex is trivial.
<?xml version="1.0" encoding="utf-8"?>
<mx:Application xmlns:mx="http://www.adobe.com/2006/mxml" layout="vertical" backgroundColor="white">

<mx:Script>
<![CDATA[

[Bindable]
public var someName:String;

]]>
</mx:Script>

<mx:TextInput text="{someName}" />

<mx:Label text="This is the local obj 'someName': {someName}" />

</mx:Application>
That’s all well and good but what if we want to change the someName variable back? We insert a Binding tag to bind back – two way binding.
<mx:Binding source="textInput.text" destination="someName" />
OK great. But something is happening here that needs to be discussed. The binding is REPLACING the reference of “someName” to that of a new String. So it may be logical to assume that we need two-way binding when updating the destination of some binding to reflect the changes in the source. But, hang on:
Say I have this Model:
package
{

	[Bindable]
	public class TestModel
	{
		public static var obj:TestObject = new TestObject("test via model","me via model");
	}

}
And say I have some Object: (TestObject.as)
package
{
	[Bindable]
	public class TestObject
	{

		public var name:String;

		public var desc:String;

		public function TestObject(n:String, d:String)
		{
			this.name = n;
			this.desc = d;
		}

	}
}
And this is my Application:
<?xml version="1.0" encoding="utf-8"?>
<mx:Application xmlns:mx="http://www.adobe.com/2006/mxml" layout="vertical" backgroundColor="white">

	<mx:Script>
		<![CDATA[

			[Bindable]
			public var someObj:TestObject;

		]]>
	</mx:Script>

	<mx:Binding source="TestModel.obj" destination="this.someObj" />

	<mx:Binding source="textInput.text" destination="someObj.name" />

	<mx:Label id="someLabel" text="From the MODEL: {TestModel.obj.name}" />

	<mx:TextInput id="textInput"  />

	<mx:Label text="This is the name locally: {someObj.name}" />

</mx:Application>
I’m simply binding the Model to the local “someObj” (one-way) and then ensuring that changing the TextInput will change the name property of “someObj”. What happens? Try it.

Notice how my Model is also changing? So, you can see that one-way binding actually ensures that both the source and the destination point to the same object reference. You use two-way binding if you need to change the entire destination object completely and want this to be reflected in the source.
Let’s have a look at the final example:
<?xml version="1.0" encoding="utf-8"?>
<mx:Application xmlns:mx="http://www.adobe.com/2006/mxml" layout="vertical" backgroundColor="white">

	<mx:Script>
		<![CDATA[

			[Bindable]
			public var someObj:TestObject;

			private function onEnter():void
			{
				someObj = new TestObject("created locally","local");
			}

		]]>
	</mx:Script>

	<mx:Binding source="TestModel.obj" destination="this.someObj" />

	<mx:Binding source="textInput.text" destination="someObj.name" />

	<mx:Label id="someLabel" text="From the MODEL: {TestModel.obj.name}" />

	<mx:TextInput id="textInput" enter="onEnter()"  />

	<mx:Label text="This is the name locally: {someObj.name}" />

</mx:Application>
Now, when you hit “ENTER” on your keyboard aftering entering some text, you’ll see the local object now points to a new object instance. And, you can see the Model doesn’t change from this point on, because it still points to the original instance. If you wanted the Model to update from this change, you would add:
<mx:Binding source="someObj" destination="TestModel.obj" />
Although you’d be careful to insert it AFTER the Binding tag that assigns someObj as the destination and TestModel as the source. Otherwise you’ll set the Model to null before you begin!
Make sense?
Comments : 5 Comments »
Tags: adobe, as3, databinding, development, flex
Categories : Uncategorized


Recent Comments